AppSheet가 Google Workspace와 통합될 수 있다는 사실을 알고 계십니까? Google Cloud의 코드 없는 애플리케이션 플랫폼인 AppSheet가 일반 사용자의 워크플로우를 간소화하는 데 어떻게 도움이 되는지 설명하고 Google Sheet에서 자신만의 앱 제작 방법을 설명합니다.
소개
AppSheet 및 Google 기술을 사용하여 애플리케이션을 구축하는 방법에 대해 설명하고 간단한 시연을 합니다. 첫 번째 설명으로 AppSheet의 기본 사항과 이 기능이 Google Workspace 사용자가 프로세스를 간소화하고 생산성을 높이는 데 어떻게 도움이 되는지 살펴보겠습니다.
앱시트란? = 코드를 최소화하고 다양한 구글 API와 연동되는 민첩한 애플리케이션 개발하는 플랫폼
먼저, AppSheet란 무엇일까요?
AppSheet는 강력하고 민첩한 노코드 애플리케이션 개발 플랫폼으로, Google Cloud의 일부입니다. 기능이 풍부한 엔터프라이즈급 애플리케이션을 전례 없이 쉽고 빠르게 생성할 수 있다는 점에서 강력합니다. 앱을 실시간으로 신속하게 프로토타입하고 사용자 지정할 수 있는 반복 환경을 제공한다는 점에서 민첩합니다. 따라서 전체 응용프로그램 개발 프로세스를 능률화합니다.
AppSheet의 코드 없는 접근 방식은 일반 사용자에게 사용하기 쉽고 대화형 UI 생성 및 사용자 지정 기능과 함께 워크플로우 논리 구조를 지원합니다. 쉬운 UI 생성 및 워크플로우 생성은 모두 엔터프라이즈 애플리케이션 개발의 가장 어려운 측면을 크게 단순화합니다.
- AppSheet는 사용자가 좋아하는 구글 기술의 기능을 활용할 수 있도록 한다는 점에서 구글과 통합되었습니다.
- 엑셀과 같은 시트 및 파일을 저장하는 드라이브 모두에서 직접 응용프로그램을 만들 수 있습니다.
- AppSheet는 Apps Script에 연결할 수 있으므로 Google Workspace 사용자는 기존 AppsScript 코드를 AppSheet 프런트엔드 애플리케이션과 연결할 수 있습니다.
- AppSheet를 사용하면 Google Cloud SQL뿐만 아니라 다른 클라우드 기반 MySQL 데이터베이스에도 연결할 수 있습니다.
- Google Cloud Api 커넥터를 통해 AppSheet는 현재 지원하는 방대한 API 및 서비스 세트에 연결할 수 있습니다.
이러한 멋진 새로운 기능을 모두 살펴보기 전에 먼저 AppSheet 애플리케이션 개발의 소개 예를 살펴보겠습니다
데모 - AppSheet에서 첫 번째 앱 구축 (진척률 관리)
구글 스프레드시트에 저장된 데이터로부터 AppSheet 개발 플랫폼을 불러오고 각 데이터 항목별로 입력방법을 간단한 설정으로 변경할 수 있는 것을 소개합니다. AppSheet의 다양한 기능 중에 가장 기본인 Data와 Ux 만 설명하겠습니다.
먼저 첫번째 실습을 위한 준비물 3가지를 알아보겠습니다. PC에 크롬이 설치되어 있고, 구글 계정이 등록되어 있으면서 AppSheet 에도 구글 계정으로 가입을 합니다. 그러면 첫 번째 실습을 위한 준비는 모두 끝났습니다. 구글 계정으로 연결된 크롬에서는 구글 스프레드시트라는 것을 기본적으로 제공하며 MS-Office의 엑셀과 동일한데 별도 프로그램 없이 크롬에서 작동하는 엑셀이라고 생각하면 됩니다.
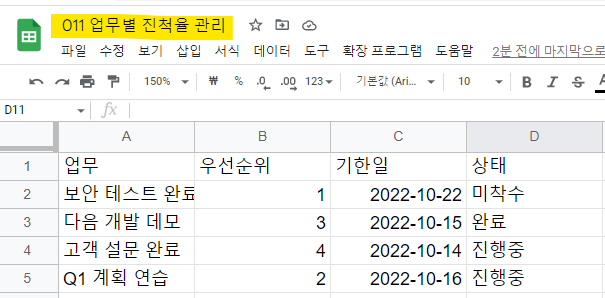
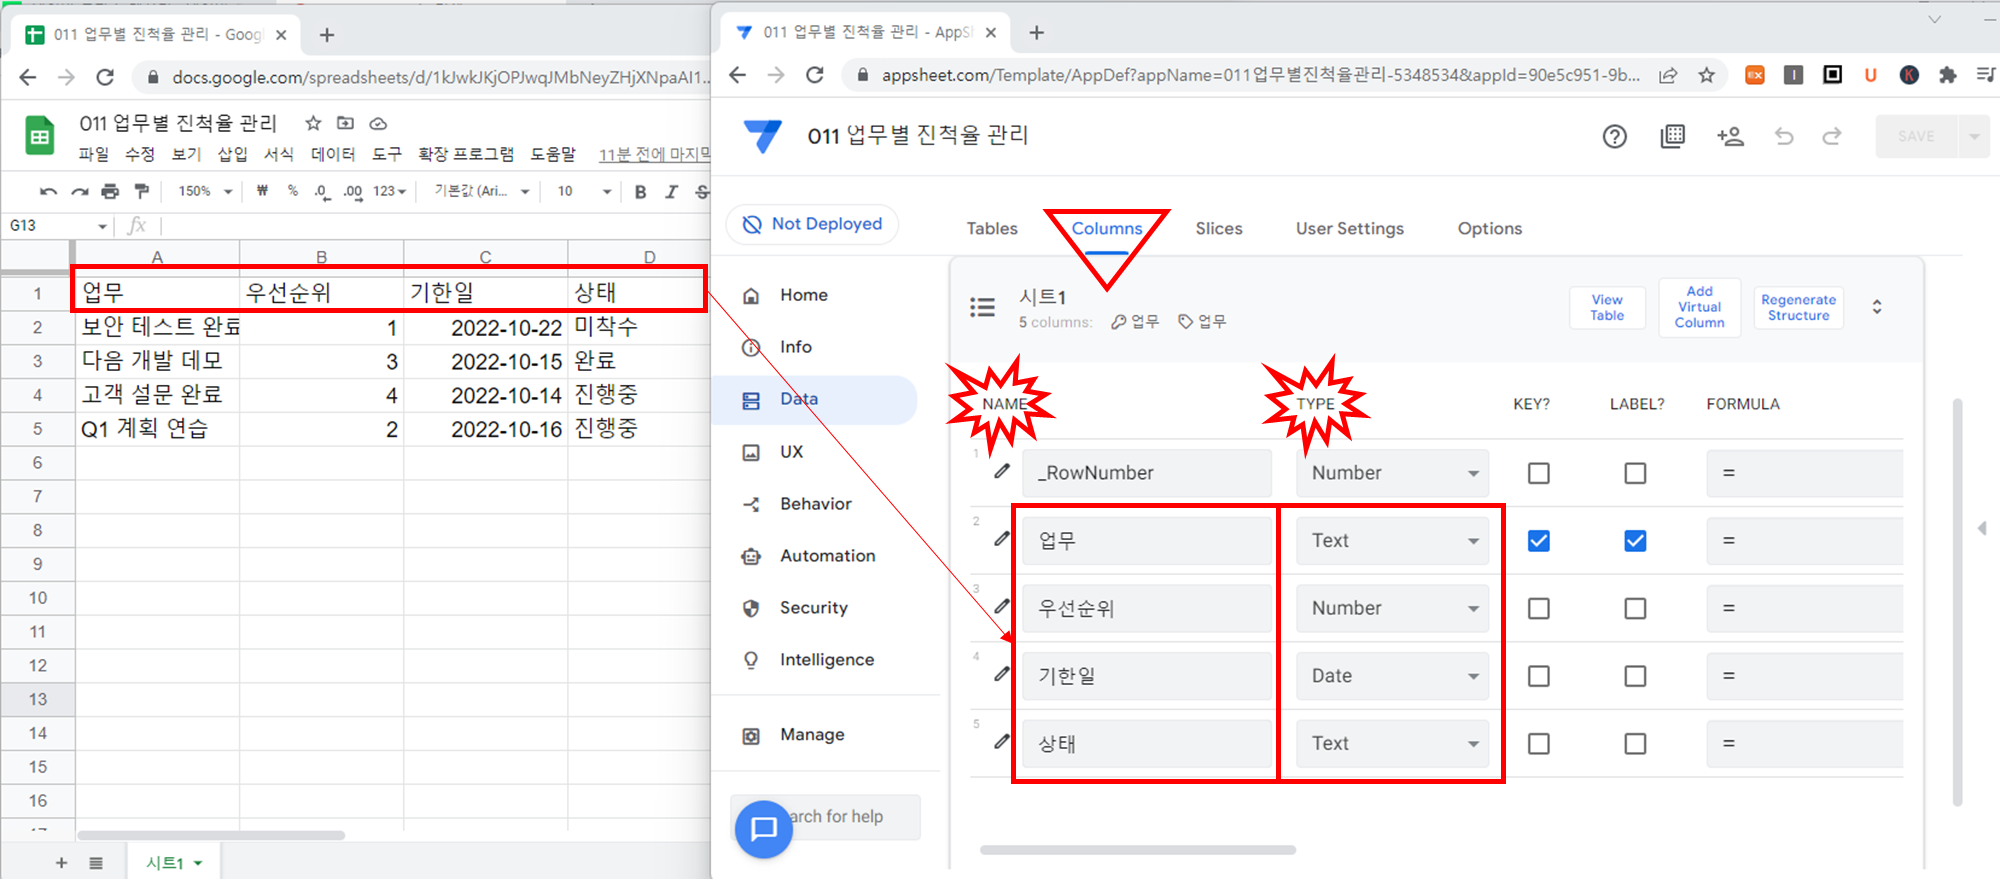
- 업무별 진척률 관리 구글 스프레드시트 데이터
AppSheet를 작동하기 위해서는 반드시 1개의 구글 스프레드시트가 있어야 하고 그 스프레드시트에 1개 이상의 워크시트가 존재해야 합니다. 아래 예시는 워크시트 이름을 별도로 지정하지 않아 기본명이 "시트1"로 정의되어 있습니다.
실습은 업무별 우선순위로 기한일과 상태를 관리하는 간단한 진척률 관리 1개 워크시트로 시작해보겠습니다. 크롬에서 구글 스프레드시트를 실행하고 아래처럼 스프레드시트 이름은 "011 업무별 진척률 관리"라고 명명합니다. 업무, 우선순위, 기한일, 상태 등 4개 항목을 가로로 작성하고 세로로 데이터 4줄을 입력합니다. 항목명은 아래 예시와 동일하게 하되 데이터 4줄은 다르게 입력해도 상관없습니다.
https://docs.google.com/spreadsheets/d/1kJwkJKjOPJwqJMbNeyZHjXNpaAI1leJo1bCjVjxNhc8/edit#gid=0
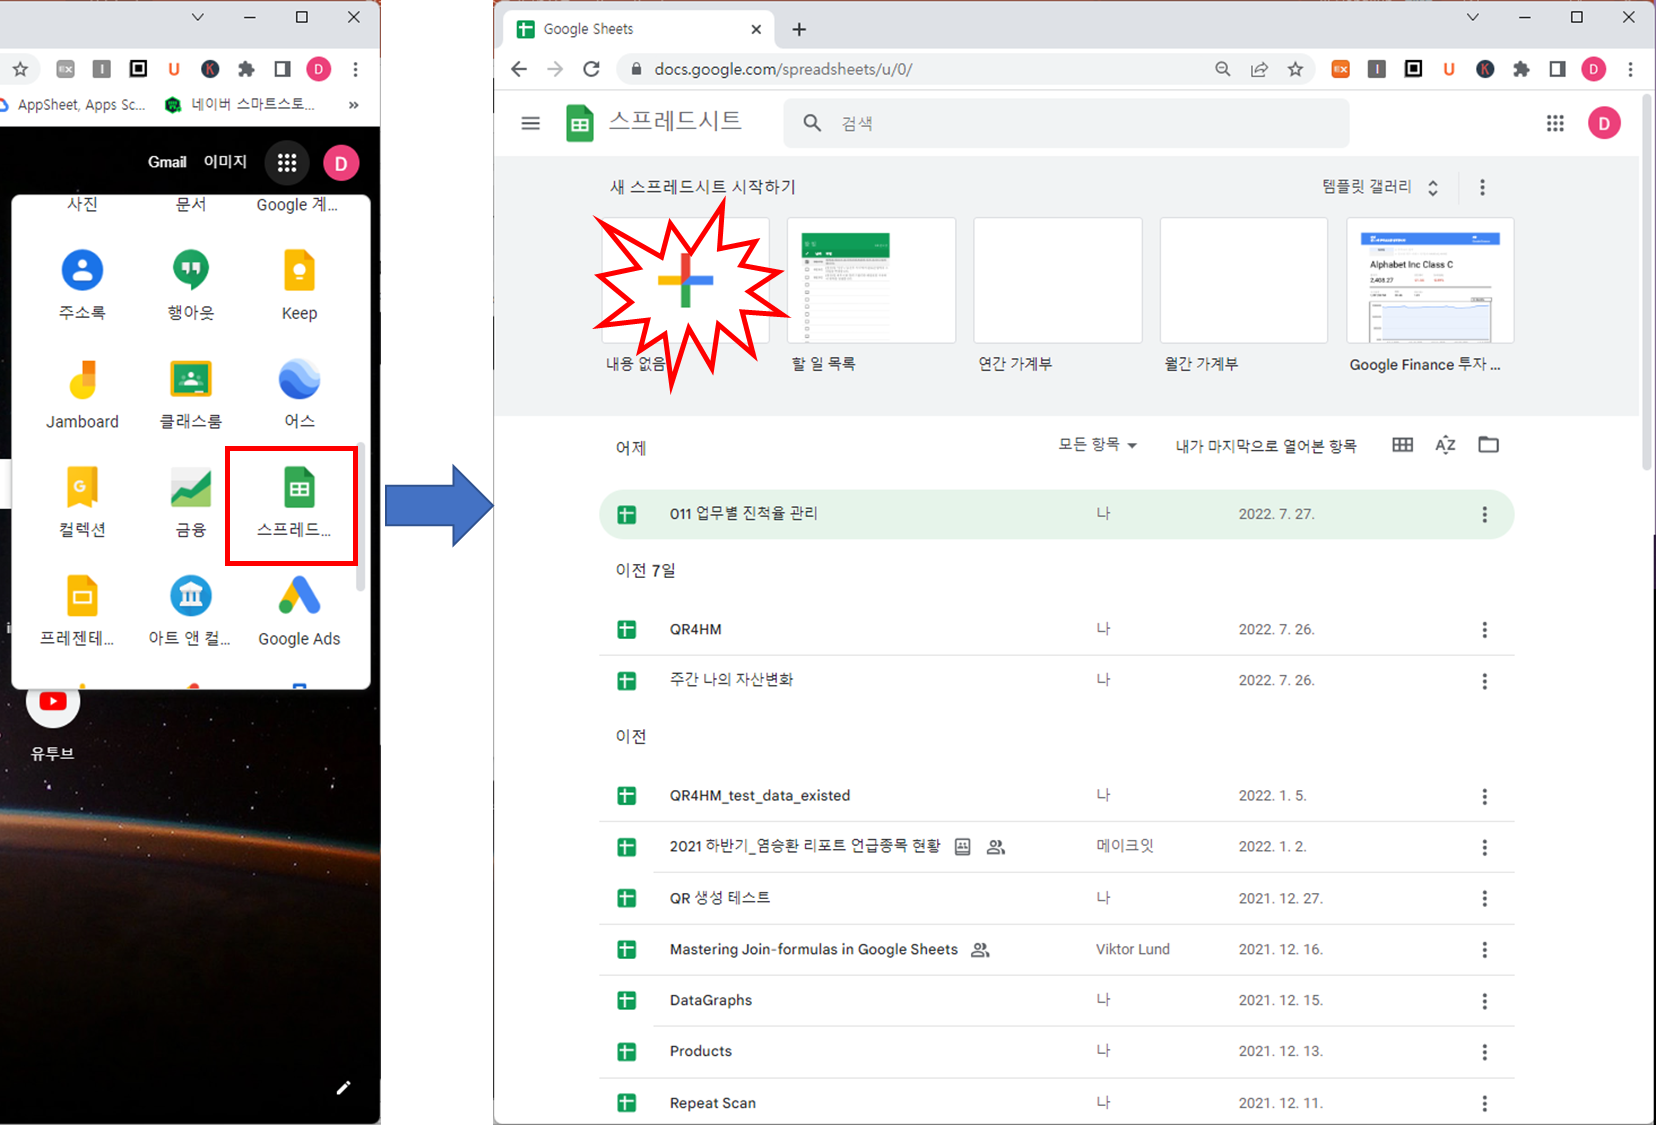
- AppSheet 개발 플랫폼을 불러오기
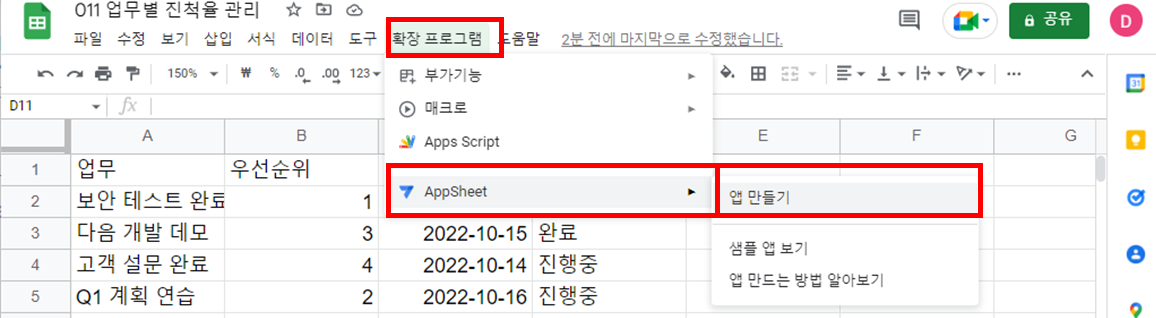
1개의 구글 스프레드시트가 있어야 하고 그 스프레드시트에 1개 이상의 워크시트가 존재해야 하면, 확장 프로그램 > AppSheet > 앱 만들기를 순서대로 선택하면 AppSheet가 실행되면서 모바일앱을 정의할 수 있는 작업창이 크롬에서 보이게 됩니다.
AppSheet 가 작동하면서 보이는 작업창은 아래 그림의 오른쪽과 같이 보이게 됩니다. "011 업무별 진척율 관리"라는 구글 스프레드시트명이 AppSheet에서 제작할 앱의 이름이 됩니다. 시트1은 데이터 1개를 나타나는데 기본 명칭을 사용했기 때문이 "시트1"로 그대로 전이됩니다. IT에서는 이런 1개 시트를 테이블이라고 하며 아래 오른쪽 중간에 역삼각형(▽)으로 표기된 "Tables"라는 탭 메뉴로 확인 가능합니다. 그리고 Tables 보다 약간 밑에 "View Columns"를 클릭합니다.
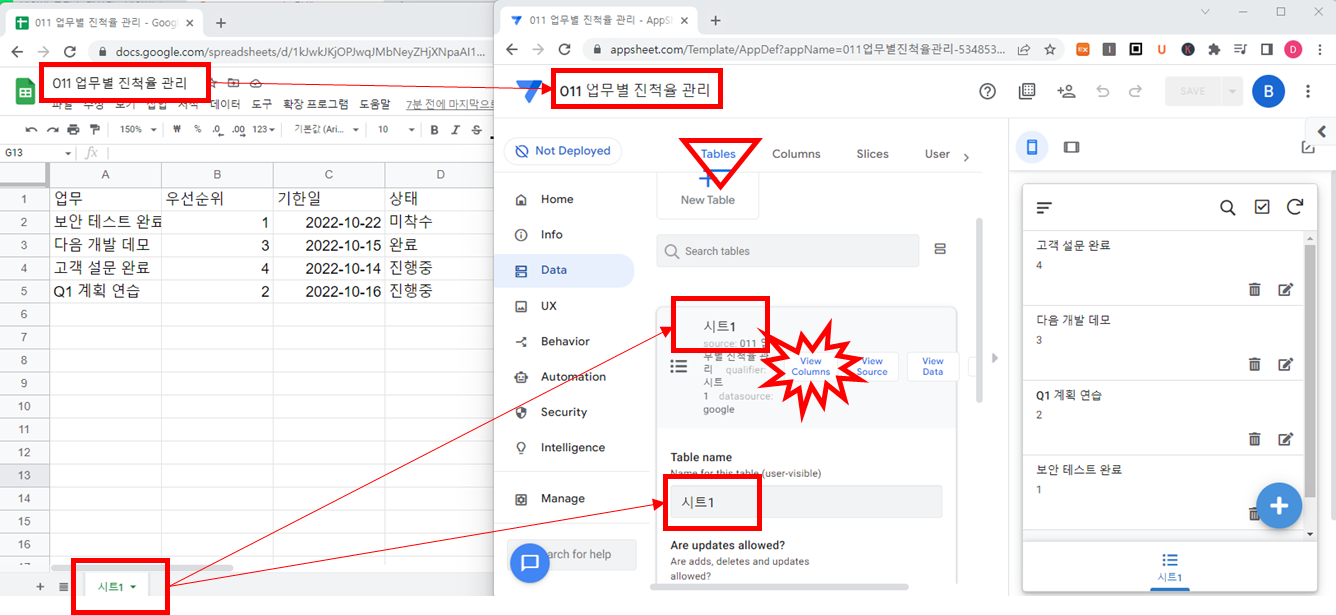
"View Columns" 탭 메뉴는 구글스프레드시트에서 정의된 항목명과 데이터 유형을 보여줍니다. 이를 Columns라고 하며 아래 그림에서 역삼각형(▽)으로 표기되어 있습니다. 업무, 우선순위, 기한일, 상태 항목명이 오른쪽 AppSheet의 NAME에 자동으로 정의되었습니다. 그리고 데이터 유형 (TYPE)은 별도로 지정하지 않았지만 이미 정의된 데이터 4줄의 특성을 보고 자동으로 정의합니다. 업무는 Text 형, 우선순위는 숫자형(Number), 기한일은 날짜형(Date), 상태는 Text형으로 자동 정의되어 있습니다. NAME에 _RowNumber는 구글 스프레드시트에는 정의되어 있지 않지만 데이터의 중복을 배제하기 위해 AppSheet 가 임의대로 생성된 항목입니다. 아래 예시에는 KEY라는 것이 있는데 데이터 1줄의 대표성을 띄는 항목을 말합니다. 대표성이란 다른 데이터와 차별화되는 항목으로 중복을 허용하지 않습니다. 필자는 _RowNumber 를 KEY로 설정합니다. 아무래도 다양한 업무를 하다 보면 중복이 발생할 수 있기 때문입니다.
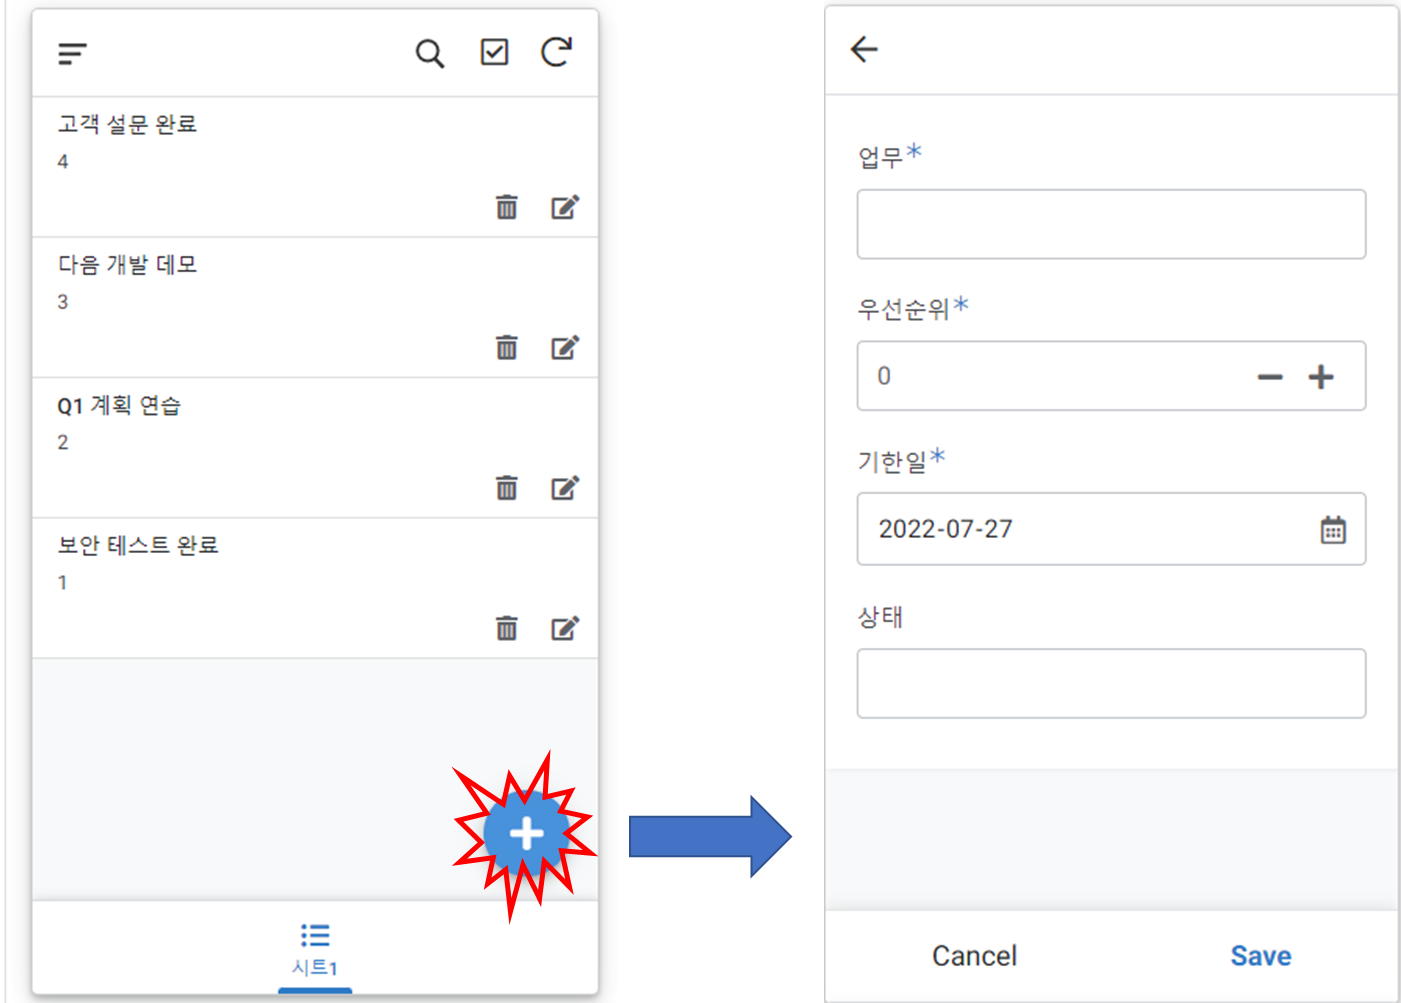
아래 그림처럼 AppSheet 가 실행되면 구글 스프레드시트에 작성된 데이터들을 볼 수 있습니다. 그리고 하단에 + 를 클릭하면 오른쪽처럼 입력할 수 있는 화면으로 넘어갑니다. 초기 입력방법은 아래 그림의 오른쪽 처럼 일일이 손으로 타이핑하게 정의되어 있습니다. 사실 여기까지가 AppSheet의 아주 간단한 실습이 끝난 것입니다.
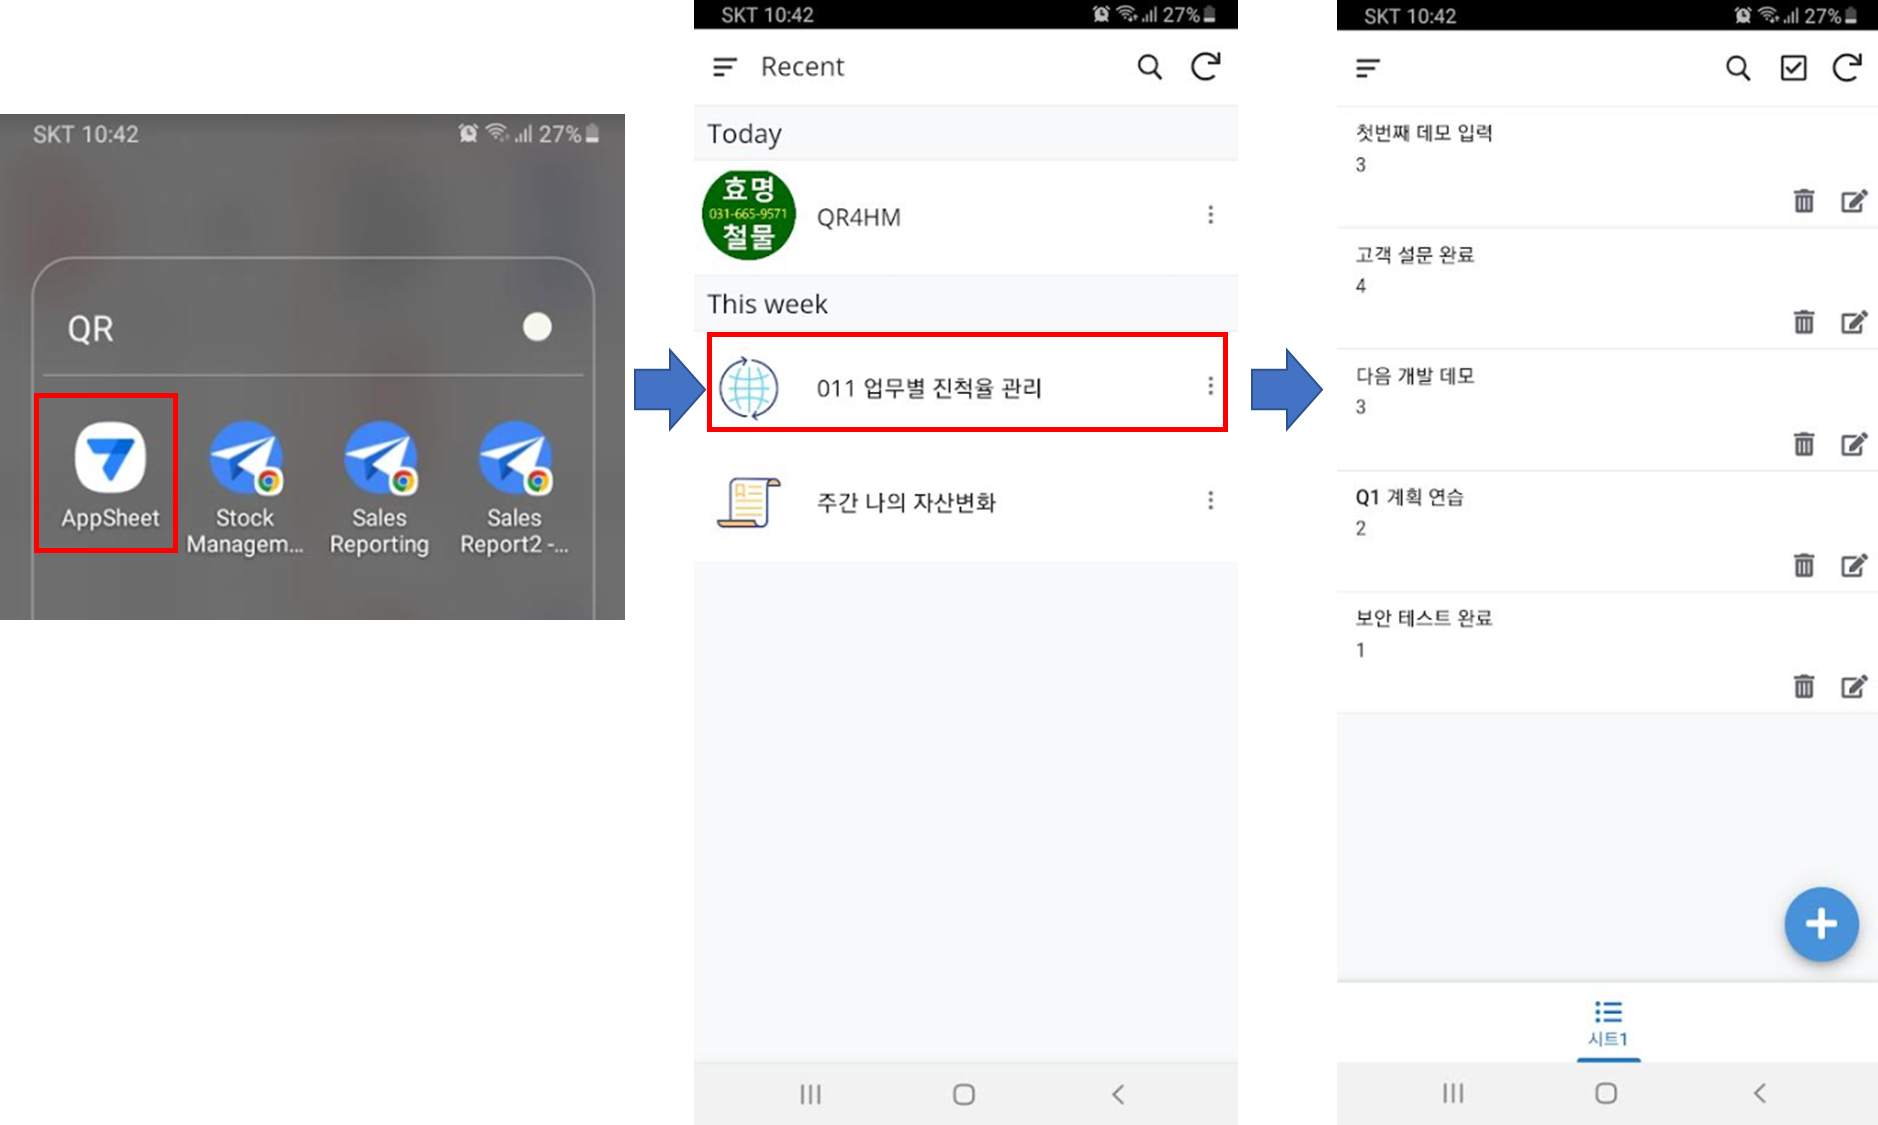
구글 플레이스토어에서 AppSheet를 설치하고 가입된 계정으로 AppSheet에 로그인하고 실행하면 지금까지 설명한 PC의 크롬에서 설계한 앱을 실행할 수 있습니다.
- 기본적인 입력방법을 다양하게 변경하기
우선 선위, 기한일, 상태 항목의 데이터를 손으로 일일이 입력하는 방식을 오른쪽처럼 선택할 수 있게 변경해 보겠습니다.
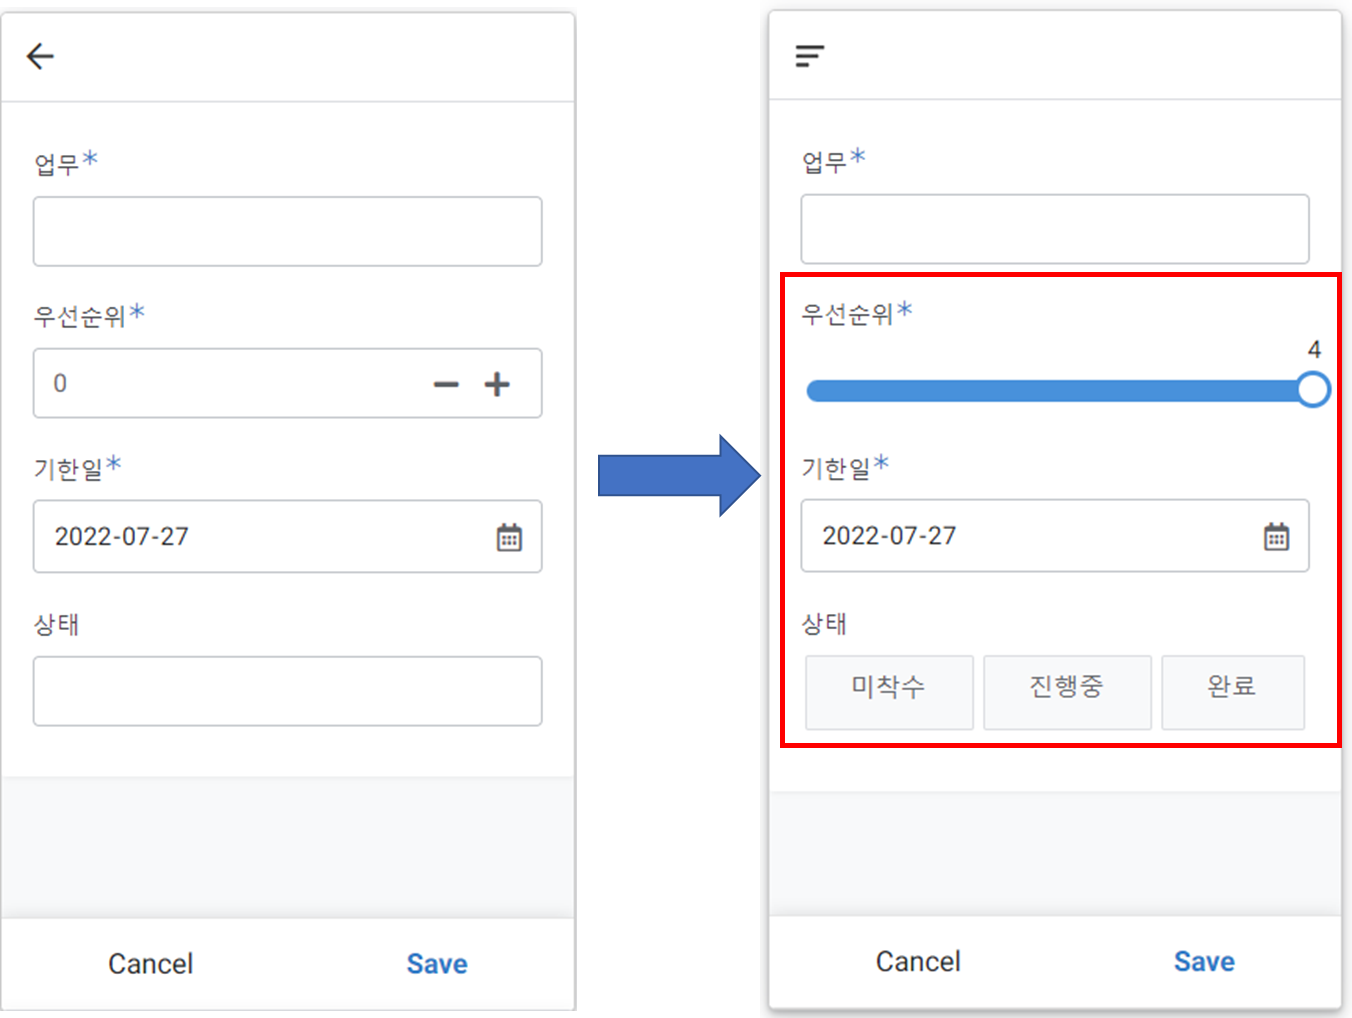
크롬 AppSheet의 Data 메뉴에서 Columns 탭 메뉴를 실행합니다. 그리고 "우선순위" 항목 왼쪽의 "연필" 모양을 클릭합니다. 그러면 오른쪽 그림처럼 Type부터 Initial Value까지 항목 설정을 변경하는 새로운 창이 보입니다. 우선순위는 1순위부터 4순위까지 숫자형으로 4개 항목만 선택하면 되기 때문에 Range를 선택하고 초기값이 1부터 4까지 설정합니다. 마지막으로 초기값 (Initial Value)를 4로 설정합니다.

하나의 업무는 하루 만에 끝나는 경우도 있지만 대부분 며칠 이상 걸립니다. 필자는 기한일을 오늘부터 5일 뒤로 설정하겠습니다. 5일 뒤로 설정하는 이유는 큰 의미는 아니고 월요일에 업무를 시작하면 금요일에 마무리 짓기 위해서 5일 뒤로 설정하였습니다. 큰 의미는 없습니다. 본론으로 돌아와서 Columns 탭 메뉴를 실행합니다. 그리고 "기한일" 항목 왼쪽의 "연필" 모양을 클릭합니다. 기한일은 날짜(Date) 형이 때문에 초기값 (Initial Value)는 Today()로 설정되어 있습니다. 이를 변경하기 위해 Initial Value의 "위로 향하는 깔때기"를 클릭합니다.
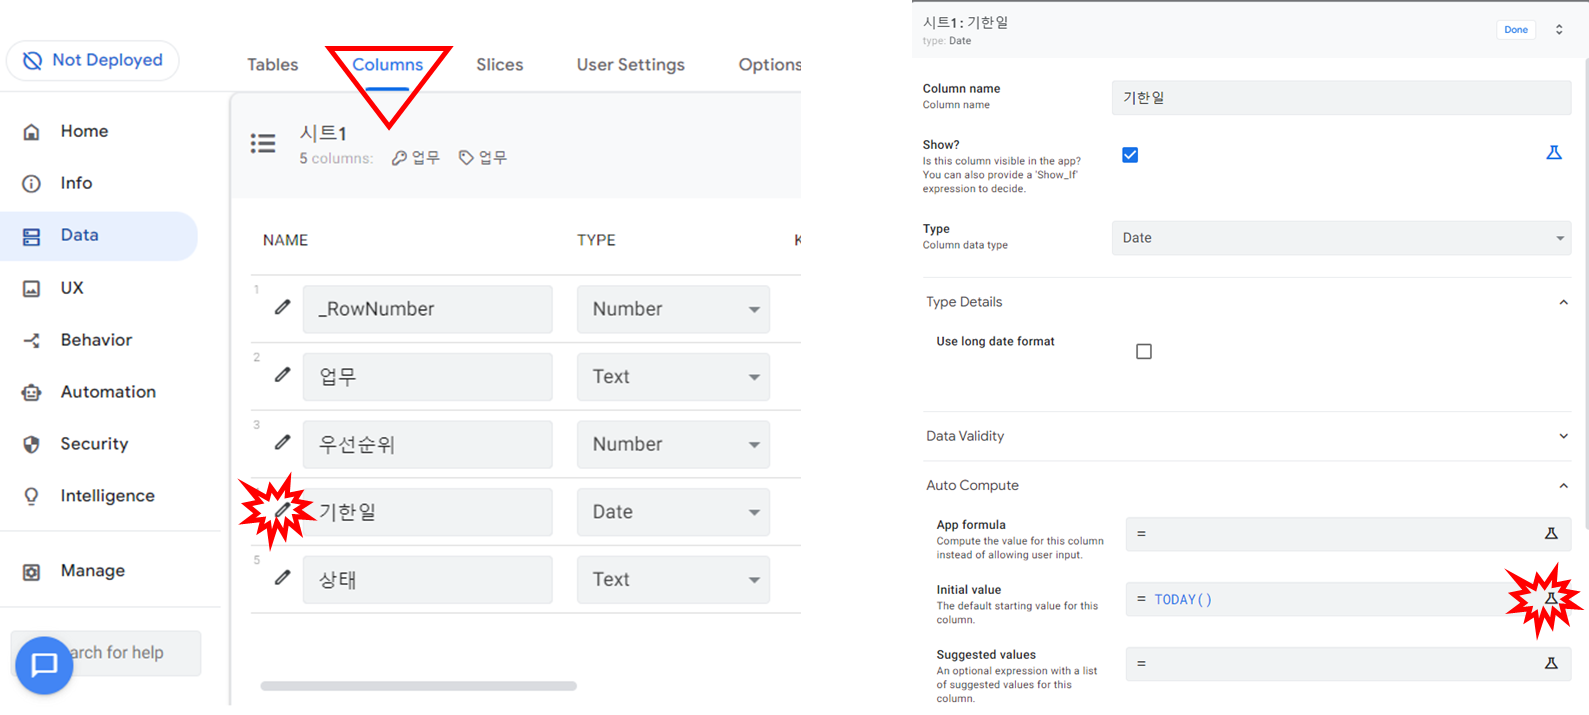
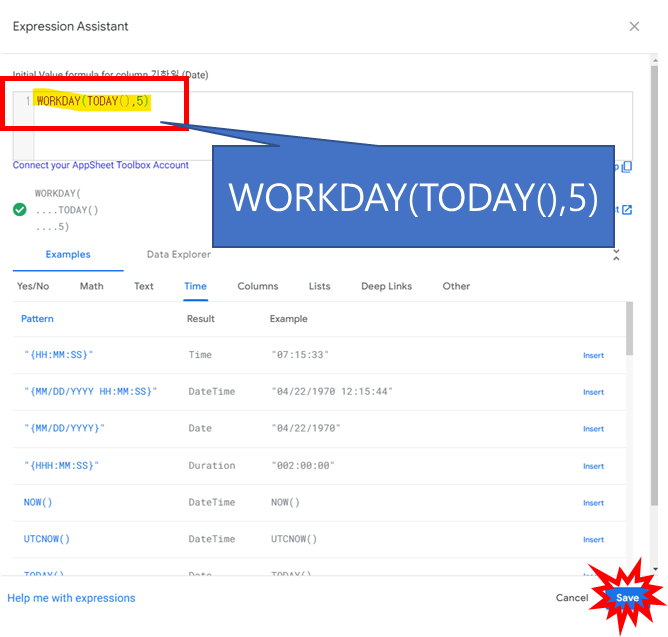
Expression Assistant라는 창이 보이면서 Today()를 삭제하고 "WORKDAY(TODAY(),5)" 함수로 변경합니다. 이 함수의 의미는 오늘부터 주말을 제외한 5일 뒤로 날짜를 계산하여 초기값으로 설정합니다.WORKDAY(TODAY(),5)
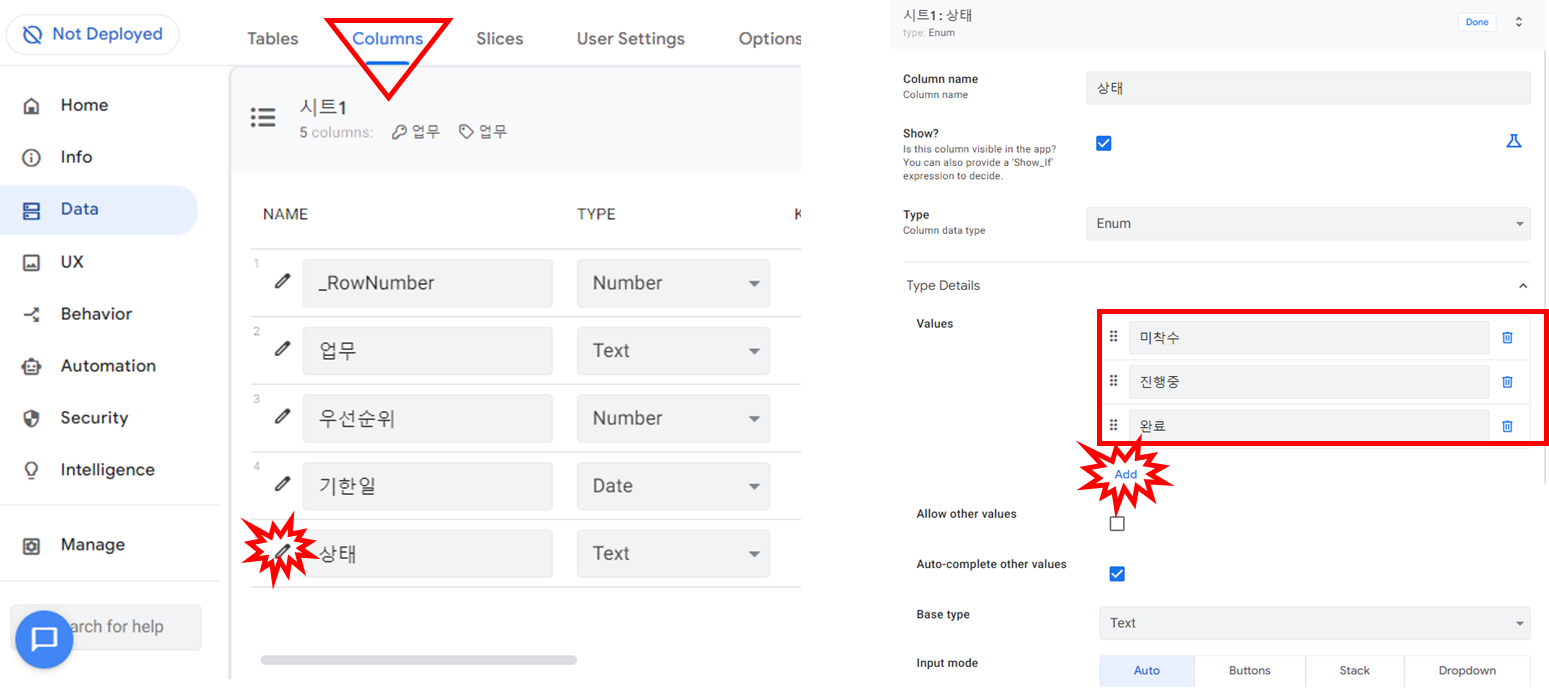
이번에는 상태를 3가지 중 1가지만 선택하게 입력방식을 변경해 보겠습니다. Columns 탭 메뉴를 실행합니다. 그리고 "상태" 항목 왼쪽의 "연필" 모양을 클릭합니다. 그러면 오른쪽 그림에서 Values에 Add 버튼을 클릭하면 선택할 항목을 미리 입력할 수 있습니다. 아래 예시는 미착수, 진행중, 완료 로 입력하였습니다.
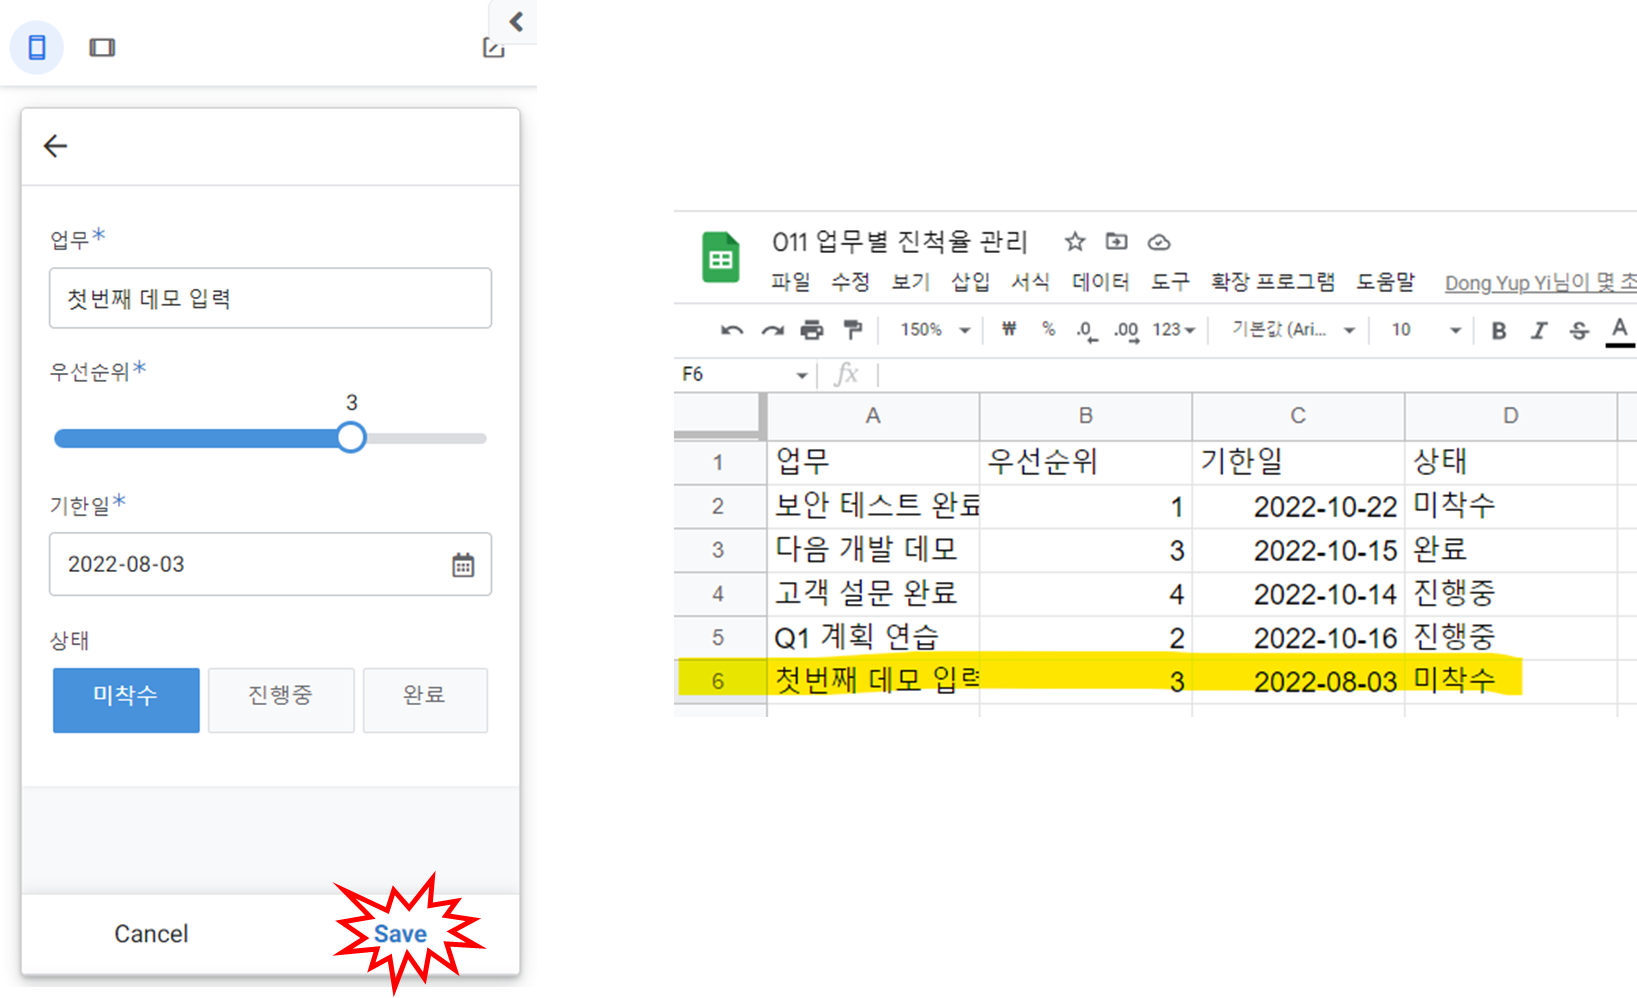
다시 모바일에서 또는 PC에서 AppSheet를 실행하고 아래 그림처럼 입력을 하고 "Save"를 클릭하면 오른쪽의 구글 스프레드시트에 새로운 데이터가 추가된 것을 확인할 수 있습니다.
요약
간단한 AppSheet 사례를 소개하였고 아래와 같이 요약됩니다.
- 준비물 3가지 : PC, 크롬, AppSheet에 구글 계정으로 가입
- AppSheet 실행 위해 필요한 것 : 1개 구글 스프레드시트 및 1개 이상 워크시트
- 모바일 AppSheet 실행 방법 : 구글 플레이스토어에서 AppSheet 다운로드, PC에서 가입한 것과 동일 계정으로 로그인
- 개발된 앱 실행 방법 : 구글 스프레드시트 이름과 동일한 앱 실행
- 입력 방법 변경 : Columns에 나열된 항목 옆 연필 아이콘을 클릭하여 입력방식 변경
https://www.youtube.com/watch?v=baZDCdqVt7A&list=PLU8ezI8GYqs7hJp2tx3k7eReVqSCQYDQg&index=13
- Intro
Hello, and welcome to the new "Building with AppSheet" series, where we will discuss and demonstrate how to build applications with AppSheet and Google technologies.
I'm Christian Schalk, a Google Developer advocate.
And in this first episode, we'll review the basics of AppSheet and how it can help Google Workspace users streamline processes and increase productivity.
- What is AppSheet
So first off, what is AppSheet?
AppSheet is a powerful and agile no-code application development platform that is now a part of Google Cloud.
It's powerful, in that it can easily generate feature-rich enterprise-class applications with unprecedented ease and speed.
It's agile in that it provides an iterative environment to quickly prototype and customize apps in real time,
thus streamlining the overall application development process.
AppSheet's no-code approach offers citizen developers easy-to-use, interactive UI generation and customization, along with assisted workflow logic construction,
both of which greatly simplify the most challenging aspects of enterprise application development.
AppSheet integrates with Google, in that it lets users leverage the features of their favorite Google technologies.
Here are some of the existing integrations with more to follow.
First off, Google Sheets and Drive now offer built-in product integrations with AppSheet, meaning that you can create applications directly from both Sheets and Drive.
AppSheet can now connect to Apps Script, allowing Google Workspace users to connect their existing Apps Script code with AppSheet front-end applications.
Also, AppSheet allows you to connect to Google Cloud SQL as well as any other cloud-based MySQL database.
And finally, through its Google Cloud Apigee connector, AppSheet can also connect to the vast set of APIs and services that Apigee currently supports.
Before diving into all of these cool new features, let's first step through an introductory example of AppSheet application development.
- Demo - Building your first app on AppSheet
To get started, we will start with a common task-tracking use case which starts out with a Google Sheet.
I will then quickly generate and customize a modern business app on top of it with AppSheet.
So as you can see, I have a simple sheet which keeps track of tasks.
So normally, I would switch over to AppSheet and build the app from scratch directly.
But thanks to the new integration, I just select the Tools menu and generate a new application in AppSheet.
So now AppSheet is taking over and building us a new default application without writing any code.
And there we go. We are now looking at the AppSheet environment.
And you can see that on the left side, we have the different tabs.
And the first data tab there is what we're looking at here with the different columns from our spreadsheet.
And then, of course, UX is where we can update the UI, or essentially, the user interface.
And so we have the default UI.
And then, of course, there's other features like behavior and workflows and such, but we'll get into that later.
For now, let's go ahead and customize the data a bit.
And we're going to look at the data columns as we edit in the application.
And, of course, keep in mind, on the right side, we have a nice preview capability that's constantly being updated.
And so I can actually go through and test it on the fly with actual data and just make sure the application is functioning correctly.
So, for example, I could Edit or add data, and everything just works as you expect it to.
Now, as you notice, there are a few things I might want to improve on this app.
So first off, to create a new record or a new task, I might want to restrict some of the values.
So the priority right now allows any number.
So I'm going to make it so that I want to have values between 1 and 4.
I can also set the due date to be some date into the future.
And then also, for the status, I want to restrict it to have only specific values, not any kind of random text.
So this is all very easy to do.
So let's just go ahead and switch back to the column editor, and we'll start updating some of the input options for the columns.
So first off, the priority as I said, I want to restrict it between values 4 and 1.
So the maximum is 4, minimum is 1.
And so let's go ahead and set, also, an initial value for this to be also 4.
Now, you'll notice here, this is an expression assistant.
And this allows us to derive data dynamically.
And this tool helps you evaluate and make sure that it's valid.
So it gives you that little green check box there to let you know that you have the correct values.
Now, for this, it's just a simple static value.
But later on, you'll see that it will be evaluating functions.
So everything looks good here.
I'll go ahead and finish up for this particular column for the priority.
Oh, also, I'm going to change the Display mode to Range mode.
And that will give us a nice slider.
So the slider, just a little bit easier to use.
So that's the priority.
Now, let's go to the due date.
I want to change it such that the date that gets defaulted will not just be today, but it will be a date into the future.
And so for this, I'm going to insert a function called WORKDAY.
And that takes two arguments.
It takes the current day or whatever date and then I'm going to give it the second argument of how many days into the future do I want?
So I'll select 5, and I want 5 workdays into the future basically.
So that evaluates correctly.
I'll click Save, and I'll click Done.
And then now, for the final column,
I'm going to update the status column such that I'm going to switch it from a text data type, which allows any random text, and then I'm going to switch it to Enum.
And then the enum will make it so that I can define specific values that I want for this column.
So I'll use the typical status values.
Not Started would be the first one.
Then I'll add another value, which would be In Progress.
And you could probably guess the last column which will be Complete.
All right?
So that's it.
Now, the only other thing I'm going to do is just add the auto-compute, or the initial value.
And for this one, I'm just going to put the static value of Not started.
So that means, Once I create a new record,
it'll just assume that it's going to be Not Started.
So click Save there and click Done and then I'll just save the entire application to get everything synchronized.
So once everything is synchronized, our preview window will refresh as well.
And then we can go through and try out the application with the new updates.
So let's go ahead and add a new record.
So here's the Task input form.
I'm going to type in something here, Finished Demo.
We have our fancy slider, so maybe I'll give it priority 2.
And you'll notice the due date is a couple of days--
it's actually five days specifically, five workdays specifically.
And then notice that our little enum has rendered as a set of buttons there.
So I'm just going to select In Progress and click Save.
So there's a little area there where
it's letting you know that it's synchronizing with the data.
So let's go ahead take a look at the data itself.
And there we are in the sheet, and we can see our new record.
So as you can see, in just a few minutes,
I was able to create a functioning modern web application based off of a Google Sheet, all without no code.
- Summary
So for more information on AppSheet, Google Cloud, and Google Workspace, check out the links in the description below.
And for more videos like this, make sure you subscribe so you don't miss out.
Thanks for watching.
댓글